I Fixed My CR250 Engine For 2
In a, previous video you guys somebody put together the cr250, bottom end only, to have to split the cases once again because, of a missing washer so, I've got that washer on hand I'm, gonna install it and get, the rest of this bottom end back together I am super excited let's. Get started so let's, recap things a little bit when, I went to go spin the transmission, after I assembled, it I noticed. It would bind at some point so right there it's, coming to a bind and that. Led me to digging. Into the transmission and finding that missing washer so, it goes right underneath. This. Gear, the. Last gear on the counter shaft so. We have a washer on top the gear and then. There's a little spacer, in here so. That washer, was supposed, to sit right, underneath a spacer, and the, gear so they call that a thrust washer it's like a two dollar and fifty cent piece it's, crazy how such a small part can, cause so many issues so. The transmission was binding and then, it wouldn't want to shift in a neutral either alright let's go ahead and install this washer and make sure everything, is working properly, so most washers, are gonna have a, rounded. And a. Flat, face to it the. Rounded, face always, goes up. So. It looks like that's the correct washer, I'm. Gonna slide on the gear. Spacer. And the. Washer. Here. We go. Looks. Like it all fits on there good. Now. Let's, see if it binds at all. Man. That's that spins, pretty buttery, smooth, no. Signs of any binding, all right now to test to see if it goes into neutral so, I believe I'm in first gear here all the way at the end of the drum and. One. Click over, we'll be neutral. Right. There should be neutral and, how, to test this I'm gonna hold the main shaft and spin. The counter and they're. Gonna spin independently. Of each other so you, see. You'd, counter shop the spinning, but. I'm holding the main shaft so that is indeed, neutral, sweet, so, once again guys before you fully assemble, your transmission, make, sure you've got all the clips washers, gears, all that in place before. You put the cases together learn. From my mistake it is time to slap the left crankcase back on to the engine. Now. I've got the cases pressed together thanks, to this Tusk crank puller tool these, things are super handy to have and. Before I put any case bolts in I'm definitely, going to go through all the gears in the transmission, make sure it shifts smoothly and check. The shafts or any excessive, end play. Now. That is how it's supposed to spin right there super, smooth and there's no binding at all now, I'm gonna go through the gears and make sure everything, is in order all. The way down is gonna, be first, gear and then. Half way up is neutral, right, there as neutral, so. I'm holding the counter, shaft from, the other side and the output side and spinning. The main shaft you can see they. Are not spinning together so that's neutral. Alright. There is third. Fourth. And fifth. Now. That's a huge relief to know that everything, within the cases is good to go just got to pop those case bolts back in and then, I could start assembly the clutch and the, gear shift components. Now. Before I proceed any further this, excess, gasket, material is kind of bugging me so, I'm gonna shave it down with this little scalpel, flush. With the gasket surface. Okay. First up I'm gonna assemble the gear shift components, that go right here so, that will be everything, laid out here on the table and once, again just like the previous video, I've got the diagrams, printed, out and these, are a huge help before see how everything goes together and make, a treat got all the little bits and pieces so, thanks to this nihilo concepts, engine stand I can get the engine app pretty much any angle I need so, it's gonna make the most sense in this position, here I'll, have a good angle at getting all these pieces into place the, first piece that needs to go on is going to be the tensioner, for the shift drum so, that's gonna include the, tensioner, arm looks, like the spring a washer. And the. Retaining bolt, see. If I can find this stuff here, here's. The arm. I've. Got spring. The. Bolt is gonna have a little, edge on it or a shoulder. And. That. Looks like the washer, so. When looking at this diagram looks, like the spring goes on first in, that position and then. We have a washer. In between and in. Order for the washer to stick to the little stud I'm gonna put a dab of grease on there. That, should keep it in place. And. Let's. See here, looks like there's. A little notch on the. Tensioner. Arm that. Is gonna hook up with the spring. It's. Gonna go just like that. To, be honest it's actually gonna be easier to install that texture with. The end, piece off of the ship drum and that's, usually how I install them anyways but, I just have this piece on here from the get-go I'm, gonna go ahead and pull that off and that should make my life a little easier.
They're. Not a huge deal to pull this thing off might as well do it right all, right so we got the spring. The. Washer. Get. This arm into, its. Position. Sure, everything's lines up here. There. We go and. I'm gonna put a little bit of Loctite on the shoulder bolt just got some. Blue medium, strength there. And. As. I'm tightening down this retaining bolt here got, to make sure that shoulder it's within, the arm so. There's kind of legal things around and that will allow, that. Shoulder to go into place and the torque should be around six or seven foot-pounds on that one now the spindle, can go back on and you definitely want to put Loctite, on this bolt as well. With. This piece you definitely got to make sure that groove, lines, up with the pin on the, shift drum so. Kind of line it up before you set it down and. Then. Just spin it around until it locks into place, so. Right there it's locked in and. Then the bolt can go back in. All, right so basically what this tensioner, does is it keeps the bike in the gear so. You can see as I spin, the, shift drum, it. Is gonna walk into each. Of those details. So. I'll see the notches where, that roller or that tensioner, roller sits. It. Locks right into there and that, keeps the bike in the gear so, right now we're in first and I'll show you kind. Of how the neutral, setup, works I'll, bump it up halfway it's. Like you're shifting up halfway and that. Little half. Detent. There, that. Is neutral right there and there's. A detent, for each of the five gears and neutral. It's. Going to torque the center bolt to 16 foot-pounds and, then. I'll be ready to, install. All the pieces here, on the inside. Now. For this part there's a lot of little pieces to the puzzle so, I'm gonna refer the diagram and make sure I've got everything here should. Have two, Springs. Two. Poles, two. Pins. This. Little, washer. Or spacer, and the, center piece that all this stuff goes in so just to keep everything together I'm, gonna put a little bit of assembly lube, inside. This, piece it. Always helps with assembly, too, so. First thing goes, a spring. Side. Of each hole. And. Then. A pin goes on top of that. And. Then, to top it off goes, this, little pole they call it so. The slotted. Side that goes in. You. Can see there's a right and a left Paul, this one is installed correctly because, the slot lines. Up with a pin and then if. I took the other one try. To line that one up you. Can see the slot would be off so, that goes on the other side I'm, gonna hold this Paul down with one hand, come. Over to the other side. Kind. Of make it a mess with this, assembly. Lube but it's part of it, get. The spring in there grab. The pin put, that on top. And. The. Paul, goes. On top, of that. So. That's what it looks like all put together, now. Before I slide the whole setup into, the shift drum, doesn't. Hurt to put a little bit of assembly lube in there. So. Before this piece goes into the shift drum I'll, have to slide the, retaining, plate on top of it. It's. Gotta be super careful going in not. To knock those poles, and, pins. Out of that, part. There and then once again these, bolts will need some Loctite. And. Then the last piece for the shifting assembly is the shift shaft this. Just goes right through the hole that goes through both of the cases, make. Sure there's a washer, on here, right. Here that washer most. Bikes will have that. Looks. Like I'm gonna have to spin this piece around a little bit for it to line up. Well. Unfortunately I'm. Gonna have to flip this thing around, I had it together wrong. There. We go that fits a little better before, I tighten down these bolts I'm gonna check to see if the shaft lines up and, it's. Gonna need a little, bit of Lube here for, where it goes through that seal on the other side. Yep. Looking, good. All. Right I'm gonna pop the shifter on to the other side of the engine and make, sure all. The shifting, stuff is working properly. All. Right I'm gonna show you guys exactly how, this works when you shift the bike I'm, gonna figure out what gear I'm in right now. Should. Be in first. All. Right spinning the shaft. I'm gonna go up into neutral. It's. Neutral right there now. That I've got the gear shift assembly out of the way it is on to installing, the kickstart shaft and just, like the transmission I've, got a diagram printed out here and this, time I'm actually gonna go through and check each individual.
Washer And clip not, gonna mess it up this time so, starting, at the very end here looks like we've got a spring and. Then. A looks. Like a gear with splines. In the center this. Part right here another. Circlip, and a washer, see. A washer, and obviously a circlip, then. The, main gear. That's. Obviously in place and, then, on the other side there, supposed to be a washer. Here. Take. A look see if we got that I. Do. Not see the washer there. Yeah. So number 10 right here supposed. To be a washer on this side of the gear and it, is missing see, if I can dig that one up somewhere, thankfully. I had a bunch of random hardware from this engine got it in a bag with the bike and I. Found the washer, inside of there so that'll, work out perfect. Slides. Right onto, the shaft and looks. Like it's a good fit so like, I mentioned earlier it, definitely pays to check all your washers, and clips I'm not sure what kind of effect that would have had missing, this washer but. You know what the diagram shows you got have it on there and then pass that washer we've got shaft a little. Collar this, part right here and then. The main recoil. Spring and also, there. Is another gear. That goes on the, counter shaft and, it. Looks like there's sleeve. Behind, it as well we, go find that sleeve actually. It's right here so. That's sleeve make sure it fits on to the gear, yep. It's. All good so time to assemble the kickstart, shaft onto the engine. One. Thing I need to mention with this kickstart shaft is this piece on the end needs, to go on in a certain position there's. A little dot right here a little. Locating, mark and that. Needs to be lined up with the dot on the shaft as well. Go. Ahead and. Get. Those lined up like, right a bit out there. So. Having this piece lined up it's pretty critical because, it does set the tension here on the spring and, aligns. The, stopper, tab in the correct position as well just, like installing any other part especially one this high up on the engine definitely. Want to put, some assembly Lube inside. Some, of these areas and. Then. To install the kickstart shaft this tab that I mentioned earlier needs. To go behind the, stopper, plate so. To slide it in until, it. Is right, above the stopper plate and, then. Rotate, it behind. You. Get the spring on the other side. So. Right, there that's, where it should be. And. Then. For the mainspring here you got to make sure the sleeve right inside of here is over. The. Tab, that goes into the shaft I'll, show you a better angle here so you got to have this sleeve around the tab on the spring that protrudes, down into the shaft looks. Like this together correctly, it's. Gonna set some tension, here on the spring and line. Up this tab with, this, hole on the crank case. Just. Like that. Make. Sure it's all settled. All. Right we're good to go for that part and then just below the kickstart shaft is the transmission counter shaft and this, is where the kickstart, idler gear goes, onto I've.
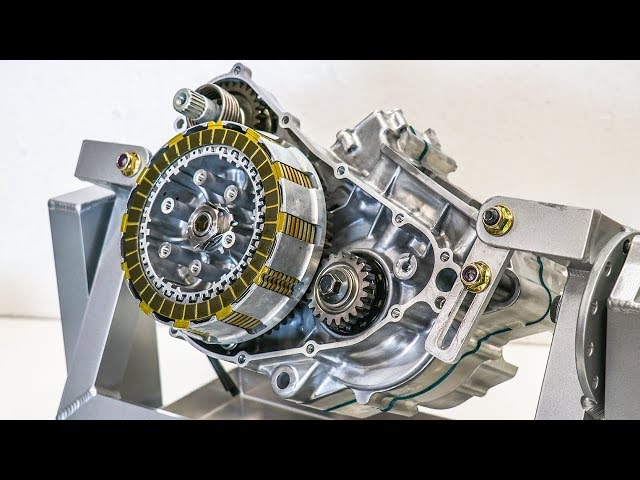
Got A little sleeve on and. Put some more assembly, Lube and, then. The idler gear slides. Onto here. So. This idler gear is what transfers power from the kickstart shaft to the clutch basket which. Is attached, to this shaft and that eventually makes its way to, the crank shaft there's, one last little thing before I start to assemble the clutch the, crank primary, gear, to go on so. That is gonna be these four pieces right here we've got the bolt a washer, the, gear itself and a sleeve that goes behind it so. I've got all that right here. And. Whenever. You're installing a gear onto a shaft you want to make sure there's no markings here on the gear or the, end of the shaft that usually indicates that things need to be lined up but, with this one I don't see any markings so it's good to go it, can be put on in any position. I'm. Just gonna leave this bolt loose for now since it's easier to set the torque once I have the clutch altogether but, don't let me forget that one guys if. You guys are enjoying the videos make sure you support the channel of a shopping, over at Prime MX com I've got hats t-shirts. Stickers, and, a few of the supplies used throughout the videos over there as well I'll put the link as the first one down, below. For. The clutch there's a lot of pieces to it so I need to check this stuff over starting. From the shaft it looks like we've got a spacer. And a. Needle bearing. Spacers. Right here, needle. Bearing. Clutch. Basket there's. A washer that goes in between. Should. Be this one right here the thicker one, clutch. Inner hub so. The basket, here the. Inner clutch hub and. The. Push. Rod or. The rod that goes through the center that's, what activates the, clutch and then. The whole plate set that is soaking in oil let, me zoom in here we've, got, another. Washer. This. One right here. The. Tab, that goes underneath, the nut that, is a like, a locking, tab so. This one, right here this, is the old one tough. You always want to replace those so I've got the new one right here. And. Then the. Nut. That, holds everything together and, that. Nut is right. Here shoot. This thing is pretty beat up should, almost replace it I'm, going to dig through my parts bin and see if I can find one of those, so. When you see this right here where the diagram has they can cut away that'll. Be like a different design or in, this case a different order of the parts so, you definitely want to make sure you've got it together correctly so. For this one I'll have to go look at the. Diagram, online to figure out which one is the correct order all right I'm over here on Rocky Mountains diagram, and how I'm gonna differentiate, the, order, here is we've. Got looks, like a 19 to 20 and then, a 24, and a 25, so. I'm gonna scroll down look. At all the part numbers here so it looks like we've got a 19, out of 20 and no. 24. And 25, so. That would indicate that, the. Design for this bike needs to be the 19 and 25 so. Washer, first followed. Up with, the. Locking tab or the locking plate and then, continuing, on down the line looks like we've got the, lifter piece a bearing. A washer. And the clip so, that's all pretty much one piece and that, is this, part right here and then. Finally, on top the clutch is the clutch pressure plate all. The clutch springs and the clutch bolts so. I've got new clutch Springs right here and there. Should be, five.
Clutch, Bolts so. It looks like everything, is here time, to start, assembling the clutch so just like the diagram shows I've got the spacer, and the needle bearing up first and, I'm just gonna coat everything, in this, assembly lube. And. Then, next up is this washer that goes in between the basket, and the inner hub and there's, a rounded, face or a rounded, edge and a flat edge if. You run your finger along the edge you'll be able to feel the difference there so, the round edge is gonna be facing out I can't. Forget a little loop here. And. Then. Next comes the clutch inner hub. So. I've got the washer this. Retaining, clip it just goes on like that with the tabs locking. Around, the. Hub, here make. Sure that's locked in and I was able to find an identical nut off of a CRF 450 that parted out but it's in a lot better shape than the old one so that, worked out perfect I really, should have just gone out and bought a new nut for this but. You know what got. To work with what you got now, the easiest, way to torque the center nut for the clutch is going to be to use a clutch, holder tool so. I've got this tool from Rocky Mountain just. Grabs on to the. Clutch hub like, so, so. I'll show you how this works in a second I'll be torquing that nut 259. Foot-pounds, now, I'm just gonna clamp, this tool on to the inner hub but. Definitely, not gonna put too much pressure on it don't want to damage that hub. Set. The torque wrench to 59, foot-pounds, and then. I'll be all ready to torque. Now. This is actually the first time I've ever used one of these clutch shoulder tools didn't. Damage the hub at all and it gave me some great leverage to torque down the nut so, I would definitely recommend grab, it in one of these from Rocky Mountain now the whole purpose of this locking washer is to bend the tabs onto the nut that, way there is no possible, way this, nut can ever come loose I'm, gonna bend some of these tabs over using, some, pliers here. Okay. Now I've got the clutch plates ahead of me so I've had these friction plates soaking in oil overnight just, in this Maxima, MTL oil since. That is what I'll be using in this bike so. You're really only to soak the friction plates the steel plates do not need to be soaked although. It's a good idea to have oil on them upon installation and, the clutch kit I'm using is this tusk setup that Rocky Mountain sent over so big big thank you to those guys for providing, this kit so all the friction plates on this bike are the same they've. All got this, little notch here on looks. Like, three. Of the tabs so. I'm gonna line all those up here in the basket, it's. Gonna reposition the stand a little bit before I start sliding these in. There. We go. So. The first one. Goes. In it, doesn't matter. Whether. It's you know which way it's facing they're all the same and. Now. For the steel plates so, there's a rounded, edge and a. Flat, edge on each plate if, you run your finger along the edge you'll be able to notice the difference so, I've always ran the plates with the rounded edge facing, out and I did some research I noticed a lot of people are saying run. The plates with, a smooth, or the rounded edge facing, in so I'm gonna try it on this one with the rounded edge facing, in but, honestly I've never noticed a difference, with, the rounded edge facing, out it might just be me but I'm. Gonna give it a shot for this build. So. Just gonna alternate, steel and friction, steel friction and then. Lining, up these notches in, the, basket as well. Alright, guys that's it for the clutch plates gonna move on to installing the rod and the. Lifter piece that goes on the end followed, up with the pressure plate so here's the push rod this runs through the center of the engine and connects, to the clutch cable on the other side so. It's the same on either end doesn't matter which way it goes in just. Gonna. Lube up everything super good with this assembly, Lube. Then. Of course we've got the clutch pressure plate. Followed. Up with some. New clutch, springs these, are from Rocky Mountains tusk. Is the brand. So. I just found out I'm missing, one of these bolts on the old hub there was a bolt snapped off in it and that's why I replaced it so, I'm gonna have to dig through the parts bin once again and see, if I can locate one, of these clutch bolts right. On I found one from the same serie four could do that parted it out it's the same length and everything but.
It's A little bit different color but who's gonna know the difference. It's. Always a good idea to tighten these bolts down, in an even consistent. Pattern I. Kind. Of want to do like a star pattern or just, alternate, every one. Now. The torque spec on these is seven, foot pounds so, I'm gonna tighten it in the same fashion as I, did earlier. Sweet. That is it for the clutch I am completely, done with it oh and, I almost forgot I still need a torque the crank primary, gear bolt to 47, foot-pounds, and. How I'm gonna do this is by, taking a rag and. Stuffing, it in between the clutch gear and the, crank gear, just. Like that and with. That I should have all the levers needed to torque this bolt down and another, thing you can actually do here is put, a penny in between the gear as well or I. Think motion Pro makes a gear. Holder tool so. It's like a little gear jammer that you put in there as well but. We'll see how the Reg trick, works. So. It seems like that worked out all right just as long as I can get this rag out of here now. All. Right cool, so I'm gonna call this side the engine done for now it's gonna flip it around and install, the flywheel, and stator. This. Crank doesn't have the Woodruff key or the locating, key for the flywheel installed yet so, I'm gonna steal the one off the old crank looks like it's in pretty good shape. Now. For installing the stator and the flywheel, it's, pretty straightforward the. Stator just uses two bolts and before. I slide, this in I've, got to put the clutch actuator, arm into, the bearing first. And. Now for the flywheel the only thing you got to consider is lining. Up the keyway with. A Woodruff, key on the crank and. Then. This bike just uses a washer, and. A. Nut. And. I. Believe I should be able to use this clutch holder tool to, hold the flywheel in order to torque the nut down let's, give it a shot. And. This. Nut calls 440, foot-pounds. So. That's as far as I'm gonna get on the engine bill for today wish, I could show you guys the engine covers but that's gonna have to wait till the next video so, stay tuned for that man, they look so good can't wait to show you guys and once again this engine bill would not have been possible without rent rabbit sending over the rebuild kit which, included that crank bearings. Gaskets. Seals the. Engine stand was supplied, by Hilo concepts, best, wood out there I love that thing, the, transmission, polishing, was done by trick engineering super. Nice addition to have I cannot, wait to test that out and then. For the clutch components, Rocky, Mountain sent those over and. Then. Oil and, assembly. Lube that, was provided, by maxima, so, a big big THANK YOU to those companies for helping out so I'm gonna wrap up the video right here hope you guys enjoyed it if you did give it a big thumbs up and hit that, subscribe button down below as, well and I'll see you all in the, engine cover video keep. It pride my friends.
2018-06-13