LIGHTROOM vs LUMINAR - Retouching the same RAW FILES
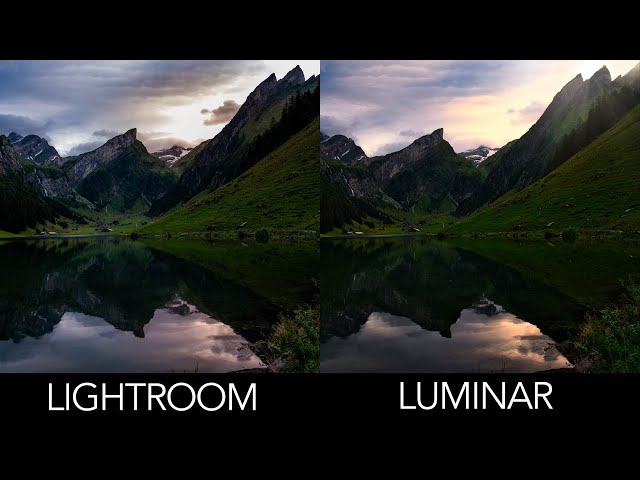
In this video i'm going to show you. Luminar. Versus. Lightroom, i'm going to take the exact same raw files. And i'm going to retouch them in lightroom. And luminar, and i'm going to go, as i go i'm going to go step by step do one separate luminar, one separate, from one separator, once upon lightroom. Stay until the end the best and the most incredible photo is at the end let's get started. All right so this is a video i've been wanting to do for a very long time which was to compare. The development. Of, raw files. Uh, lightroom, versus luminar, and i'm gonna go step by step, i'm gonna take two of my best photos i shot this month. And i'm gonna show you how you can do it in lightroom and i'm gonna show you how you can do it in luminar. A lot of people don't like to pay subscriptions. Lightroom, is a great software, i use it all the time i love it. But i can understand, luminar, is a one-time, payment and you by the way you have an amazing. Discount, on, luminar, just down below if you want to check it out. But. So let's start with this photo so usually what i do when i retouch a photo. Is first of all i always, wait, in this case i waited, really late, right after the sunset because the sky was so boring. But it got really interesting, when the sun went behind the horizon. And i really underexposed. The photo a lot. Because, that was the only way i could get a nice sky. So i'm going to open up the shadows, and check this out it's already incredible, i'm opening up the shadows. And then i'm going to do my white point. So. And i'm going to do my black point a lot of people have a, sort of a misunderstanding, what is the black and white point. Basically, the idea is you want your photo to have some pure black. And you want your photo to have some, not pure white but, close to pure white. This way you're really expressing. You know the whole spectrum, of information. So how do you do that, you hold on the option key on your keyboard you take your black slider and you move to the left, i like my photo to have a you know about two percent of pure black, what you see here in uh you know in magenta. Is. Pure, black there is no more information, it's just blackness. That only works if you hold down, the option key on a mac or the alt key on a windows as soon as i let go. You see the photo. Same thing with the white if i hold on you'll see it's black, and as i move to the right. You're gonna start seeing some white okay, so if i were to stop here i've totally blown out the sky. And there will there's no more information, i don't want that so i'm going to back it down. And i'm even going to look at it like, when it comes to highlight, i really want to get my skyrim right now my sky is fully blown away. So. Hopefully, by getting yes check this out i bring down the highlights. And it's already feeling a lot better. Okay so that's how you know that's kind of my exposure. Usually, when it comes to the white balance, i like to go on, on this one i might go on shade. Now, shade you see. The reason i don't like shade on this one is check this out you see how the blue that was there, that blue now is completely. Completely. Completely. Grayish. If i go on daylight. You see now i get the blue back. And i get the orange, i mean it was very. For like a minute it was very saturated. I'm trying to, the way i retouch my raw files right now is, i went away from the crazy hr look and i'm still, you know i'm still trying to catch an incredible, moment of light, and recreate, it, the only reason why it's so yellow is because it was truly yellow at the time and i really underexposed, the photo. So. Now. Uh, the the white balance here sometime i like to do like a white balance for the bottom but i kind of like that so, let's jump over to luminar and do the same thing so i'm in luminar, i got the same photo, same raw file exact same everything. And in luminar, it's very similar to lightroom so you've got. Essential. You've got creative. You've got portrait and you've got pro we're going to use, first. The, essential, here. And i. The advanced setting, is is on and i'm going to do the exact same thing i'm going to open up the shadows. And then i'm going to do i'm going to bring down my highlights. And then i'm going to do my black point same thing it's the same shortcut. I hold down the option key i go to the left. Until i see about. Two three percent of pure blackness. And then i do the opposite, here. And then i back it down, okay. So let's compare, that's luminar, version. That's, um. Lightroom version see how much brighter. How much more powerful, this, this are but sometimes they are too powerful, like this looks to me a little more natural, than this.
But Wait for it, uh luminar, has got different, uh, settings. So right now my main problem is that the sky, is, is um, i don't like the sky. So the first thing that i usually do is i go to um. The u saturation, in luminance. I go to my u. And, i'm gonna basically take my reds here and i'm just gonna check if i go to the left, anything that is red. Uh, or orange is gonna become more red i kind of like that you can hardly see it because it's, hardly anything, so if you don't know, you know what's, what color is there exactly, you can take this tool check this out and you click. And if you drag, up, it becomes like yellow. Uh. Lemon, kind of color i really don't like it if i go down. Yeah it becomes much more orange it's kind of really nice, i like that so you see, most of the change was done on the orange. So i changed the u a little bit because i remember was very vivid. I'm gonna go to saturation. I'm gonna put more saturation, on the orange, also, to really make it pop. And on the luminance, so the luminance, i'm going to uh. Basically. Check this out what luminous does it takes the color like orange and makes it darker on the right side, bright on the left side, when you make your color brighter, it gets desaturated. When you make it darker it gets more saturated. So i don't want to go too much it was not a crazy crazy sunset it was, it was about like this, i still think the top of the sky is not good. So, i'm going to go into uh the gradient, here, i'm going to double click on effect so that everything comes down to zero. I'm just gonna, maybe add a bit of blue. And add a bit of a minus exposure, i'm gonna click and drag. And i'm gonna make that sky, a lot nicer. Okay. And, usually what i like to do in lightroom, is the sun was sitting here i like to add a bit more color to the sun, so i'm going to take a circle i'm going to double click on effect. I'm going to click and drag make a nice. Circle where the sun is. I'm going to add some exposure. So at first it does it everywhere, but in the circle you don't want that so, you want to invert, this, okay. And i'm going to. Basically, i'm just going to add a slightly a bit of light and a bit of yellow. Okay. And i'm gonna make sure. Very important that my feathering, is. All the way mean it's if you go here, it's not feathered at all you can really see what are you doing and there it's like it sort of blends better, and i'm just gonna put it inside, i want like a very subtle. Circle. So. Before. After it's just. Subtle, okay i kind of like that let's jump into luminar and catch up. So in luminar, i'm looking at it i'm like oh it's very very dark. So i'm just going to boost the exposure. Uh i'm gonna, boost a smart contrast, that adds some kind of contrast, in a way. And i'm like i don't like the colors at all so, let's go to colors, and colors is here it's the same idea. So you go to colors. Except you don't have this tool i haven't figured out the tool so, i'm just going to go to the orange, and i'm going to change the u on the orange here i'm going to make it more red. More saturated. And. Darker. Let's check the the red here. Yeah, let's go more red, more saturated. And darker. Okay, uh. But i'm still i really don't like the sky i like the bottom but i don't like the sky it's. I don't know somehow i kind of lost the yellow. So let's see what we can do let's go to landscape, enhancer. And let's go to golden hour, the golden hour filter basically you look at this brings, back don't go too far i like to go about. 38 percent. Something like this. And, it's still a little too, weird to me, but you know what i just realized i didn't change the white balance so let's go to the same white balance that we did, which was daylight. Okay that's already a little bit better. But then we have the issues in how can we darken the top of the sky like we did here in in lightroom. How can we do that, well. If you go all the way here to pro version. You have something called adjustable, gradient. And you see here it says top and here it says bottom i'm interested by top. I'm going gonna, do the same thing i'm gonna. Minus the exposure. And i'm gonna add some blue. Okay but where is it doing its effect. You have to click on set orientation. And you can see it i want it to be just on the very top of the sky like this. Okay and i want it more so i'm going to lower the the exposure. And i'm going to add. More, blue. Something like that. And maybe i can add a bit of vibrance. And that's only for the top right, so let's see now let's compare, let's go back to lightroom.
Okay I really like the yellow there. Uh. Which i don't really have here so let's see, how could we do this. Um. Let's go to color enhancer. Okay and let's see. If i add some worms. Or change to you. What i'm looking for, let's see here change to you to yellow. Amount. Yellow. Yes. Now it's working see it's adding a bit of yellow there. Uh. But you see it's too much i only want it here, okay. So. That's i'm happy so you know the u is going to change the kind of color i just wanted to bring back some yellow, and some worms but that's way too much, i just want some of it here, so i'm going to go to edit mask, i'm going to go to regular mask same idea. I'm going to click and drag. And you see for now the red is outside, so. It's doing the reverse, of what i want to do it's basically, doing this value on outside of the circle so all you need to do is go to invert. And now it's doing it on the inside. And check this out. So. Very feathered, i'm going to put it on the side i just want to bring back some of that yellow here, that we had. It's a little too strong. So i'm gonna back down the warms. Yeah just a little too strong. And let's compare. Uh, yeah. It's pretty pretty similar, okay. Um. It's pretty pretty similar. Let's go back here into a lightroom. I'm gonna add a bit more contrast. And then um. I want to add some dodge and burn just to make the top of the lavender a little bit brighter. So i'm going to go here. And i'm just going to double click on effect and add some exposure. And i'm just going to add a bit of exposure, just a tad. On the top of the lavender, to make it just to dodge it a little bit. So the eyes goes to the brightest part of the photo so. You know it's very subtle you know check it out. Before. After, okay that's kind of cool, i'm sort of happy with what i got here. Um. This is the final result that's the, before. And that's the after. Okay let's see if we can do something similar to luminar. So uh i just want to dodge a little bit so you can go here, in the pro version you got dodge and burns you just click here on start painting. Um. I want to make sure i'm on lighten. I want to make sure, that my uh strength, is low like. Same thing than i did in lightroom like 20. And maybe. I can even reduce, you can right click. Or. I can go here to size and lower a little bit the size. And i'm just going to add. A little, bit of brightness. Here. And here. On the lavender. It is beautiful. Okay i kind of like that when you finish you click on done. And you can see here. So. This is the before, and this is the after. So i show you again lightroom. Luminar, kind of similar. It you won't be able to get the exact same result but it's kind of similar, so let's take another photo which is this one i really um, ah, i love the view but i was so disappointed, by the light but it's like one of my favorite view i've ever seen.
So Same thing here i'm just gonna. Bring down the highlights. Open the shadows. Do my black point, you know as i usually do. And do my white point. And on this one i want to cheat a little bit i want to the sun was there but it was like, almost, no light. To it you know nothing. Uh so i was like ah. I wish, i wish i could uh. I could do something there. So um. What i can do is i can take a circle. Well first, let's maybe warm things up a little bit let's let's go to daylight, as a white balance. Hmm i don't like daylight on this one let's go to shade. I don't like it's even worse. I think i'm gonna go to daylight, and i'm even gonna make it more blue. And maybe more magenta. Okay i kind of like that i don't know why i like that. And. I'm gonna go here and add a circle. And on this circle, i'm gonna. Basically. Add a bit of yellow bit of magenta, so right now it's doing it everywhere. I'm gonna invert it but on this one you gotta be very subtle first i overdo, it, i see a lot of people doing this and it's like it looks so fake. And the best way then is to take the ranch mask off, call and this thing called luminance. And what that does is just it's going to create a mask. And it's going to make that circle go behind the mountain check it out right now it's in front of the mountain, and now it's behind but the whole thing is less powerful. In front, behind, in front behind. Okay. Maybe it's a little too blown away. Maybe i should bring down the highlights, i don't know. Yeah it's too strong i'm going to back it down back it down just i just want a tad of color. A tad of color here, and i'm going to duplicate, it and maybe have this reflect, in water. So there's some kind of reflection, and when it comes to the water, it should be less powerful. So just a tad of color. On this one. Okay. Um. What else can i do well let's, do the same thing here in luminar. So luminar, let's take the next one that's. Before, after, let's take this one so same thing here i'm going to go to the. Uh to the essential. And. Let's do something make sure advanced setting is on. I'm going to open the shadows. Maybe not as much it's too much on luminar. Breathe on the highlights. I'm gonna do my black point holding the option key because, i can. And then i'm gonna well maybe not that much. And then i'm gonna do my white point. Yeah. Okay the white balance i'm gonna do the same thing i'm gonna go to daylight. And i'm going to bring back some blue. And bring back some magenta. I'm just eyeballing, it i'm not doing exactly, but it's just a general idea. And on this one. I want to do something cool, so i want to do this effect here. Uh, so same thing. I'm going to go to. Let's see here i'm going to go to ai, advance. That's something i haven't show you they have. Ai, stands for artificial. Intelligence, they have something called ai, accent. Now if you go here to the right it's just crazy it makes it like completely, fake in hdr. But if you use a little bit of it, it's kind of cool basically what it does it's open the shadows, even more and brings on the highlights, and adds saturation. So don't go all the way go a little bit i'm trying to, make this. Powerful. But still kind of looking natural. Same thing here artificial, sky enhancer. Uh, that's just gonna make the top of the sky a bit darker which is kind of cool. Okay, colors, let's see colors. Um. That's not the one that i want. I'm gonna go to uh. The. Here let's see. Golden hour let's see what the golden rp oh i like what the golden appreciate does it does this thing in the sky pretty well. I like that i'm gonna keep that. And uh let's go to the pro section. And go to color enhancer, and do the same thing that we did before. So i'm just doing on the old foot the entire photo at first and then i'm gonna add two circles. So let's go to amount.
Uh Let's go to you. I'm just looking at the sky right now uh because i'm only going to design on sky and let's go to warms. Yeah, it's a little too much, but that's fine. I like to do it too much at first so remember you go edit mask let's go to regular, mask. Let's make a mask here. Okay. Let's invert it. Okay. And then. Now you don't have on this one you don't have the possibility, to do illuminati. Mask like you you can in uh, well i didn't find it, let's see maybe advanced settings. But. No. I can just lower. Uh. The warmth, you know make it a bit more subtle. And the amount. You know make it less, less less. Less, yeah. Something like that i like that okay that's kind of cool. And now. What you can do is you can go to edit mask again. And go to radial mask again, and create another one here for the reflection. And invert it again. So now you see i got two masks. And they have all the same value here. Uh the only downside, is in lightroom i have the possibility, of lowering, the value of this one on this one i cannot. But i kind of like that so this is what i did in luminar. This is what i did in uh. In um. Lightroom. Oh i like more the luminar one for this one it's more colorful, so, let's see if we can match that. So maybe if i add a bit more contrast, a bit more vibrance. Maybe i'm going to match it i don't want to go too much i'm trying to go i really like the luminar, version on this one. Uh, i. I don't like what it does here in the sky so i'm gonna change, that. I think it's just too. Too blown away i'm going to double click on effect. I think i just want to go maybe lower the highlights, and just add. Just a little bit and just add a little bit of yellow just a little tad. Yeah something like that and this one maybe lower it even more. I don't know let's see here, so. Before. I'm sorry. So shift tab to go full screen mode backslash, key before after before, after. I'm just trying to get the emotion that i had okay i really like on this one i don't know, uh, this one is really winning for me it looks a little less natural i must say. So maybe i'm gonna go to advanced contrast, this is a feature that lightroom. Luminar, has that i really like. And you can make the sky even more crazy. Mid tones, and shadows. And um. I think it's a smart contrast that i'm doing that's too much here. So the you know retouching, is all about going back and forth you know, so i'd even touch a smart contrast maybe lower it. Maybe i'm going to lower the shadows, here, looks a little too. Open. Let's see here. And maybe my dark point is better. I kind of like that now. Except this one is not too yellow. But. I don't know every time i try to add yellow it looks kind of fake in lightroom. So yeah that looks so effect to me maybe a little bit of much yeah it looks totally fake to me. I don't know i just leave it a little bit. And um. So that's pretty much, uh the thing yeah this one is way more colorful, i'm just realizing, it's way more colorful, the one on luminar, i'm just going back and forth, luminar. Lightroom, luminar. Lightroom. I think i went too much on the vibrance, in luminar. So i'm gonna go. Down to colors. And i'm just gonna maybe.
Desaturate. Uh, no sorry take out a bit the vibrance, overall. Something like this, okay now i wanna show you something that luminar, can do, now that i've achieved a pretty similar, result on both photos. Stuff that luminor, can do. That lightroom cannot do so for example i can go here. In the. Pro section. Um, no it's not in a pro session it's probably, here. Or here yeah here, i can go to sun rays. Place, sun center. And that's the sun was truly there okay and check this out i can, i'm gonna overdo it i'm gonna i can add a ray of light here, and it's going to auto mask behind the mountain i'm going to put this, exactly, here. Because that's where the sun was and it just adds, and then you can do all you know the overall look is how much you want this to affect your photo. The sunray, lens is how much you want it to go i mean that's kind of, crazy. That's probably you get 20 000 likes in you know, in no time in instagram but it would be cheating so, i'm just going to lower it a little bit, penetration. Is is also the the light rays i just want to, have a little bit of light race you know, just for the fun, see, the auto mask it's really cool. Um. But it what it did it made the whole photo a bit darker. Which is fine so maybe i'm going to boost the overall look. Something like that check it out so that's the before. That's the after. And if you want to see the before. And the after of just, one settings you can click here. You see it just add a bit of ray of light. Uh let me show you something also cool i can go back to my library. And i can go here and then i can go. In this setting the first one. And, uh sorry the second one and i can go to ai, sky replacement. And on this one. I'm not. I'm not a big fan of the sunset that they have, so i'm going to use one of mine you can actually purchase i've i've got over 117. Skies. For sale so i'm going to go load custom sky. And. I'm going to go, on the scout i would match. Probably. Yeah i think this one's going to be good. I'm going to put this one in. But you see it's too high. So you can go here into a risen position. And i'm going to make this one much higher, much higher. Much higher. Um, i don't like this one that was another one i had i had in mind let's try another one. Let's try another let's try this one. Maybe. Yeah this one is kind of cool, it's too high now. But this is kind of cool. So that's, you know, that's that's that's a crazy feature. Uh on this one we light scene i could re-light the scene. I would go here, and uh. In the lights and i would maybe. You. Know. Bring up the highlights, make this one a bit brighter now not so bright but something this you know, so crazy stuff before. And after if i wanted to you know, i didn't have to do it and that of course i cannot do in lightroom i mean i love both software. The way i work is i usually work in lightroom, and then i go to luminar, to, add some extra things but i wanted to do this comparison. Of uh, you know. Luminar. Versus, lightroom, in you know and trying to match the same settings, a lot of people have been requesting this. Um. There is an offer on numinar, but. It's only 24 to 48 hours it's, the lowest price i think they ever made it, so i don't know when you see that video but, if it's not too late grab it if you can. I do get a commission. I've been promoting lumina for four years but. Um, to be completely, open, i because i have such a big channel six hundred thousand followers, i get. Brands. Uh ask me to promote their stuff all the time, probably i get one to two emails per day, and i only promote the stuff that i believe in, and so although i do get a commission, i i, i promote it because i use luminar.
And You know i don't promote other software, like on one or other things because i don't use them guys if you like this please, give me a little like it really helps to make this video known also leave me a comment i read every single comment, things you would like to learn, how did you appreciate, this, do you think i'm i'm, too crazy i go too far on the retouching. Do you think it's spot on i mean you were not there so you don't remember how the light was, i'm just trying to portrait what i felt when i was there, which is hard. I will see you guys in another video i hope you like this, one.
2020-09-03