Elegoo Mars 2 Pro review Resin 3D printing introduction
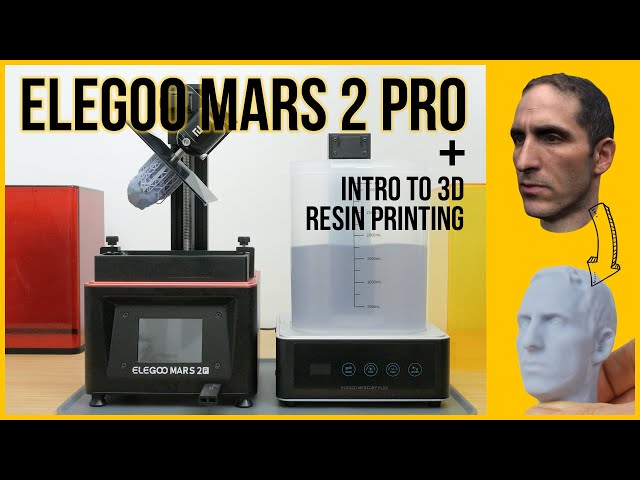
hi i'm gideon from the technologyman.com the lagoon mars 2 pro is a compact 3d resin printer that produces incredibly detailed 3d prints that almost look injection molded and despite its impressive build quality is reasonably priced at around 250 pounds or 250 dollars it almost magically turns liquid resin into 3d models using uv light i'll try and demystify the process with an introduction to resin printing then after covering the basics of the machine itself and the optional mercury plus washing cure station i print a variety of models to see just how well the printer performs and how easy it is to use i will compare resin 3d printing to filament-based 3d printing you might want to check out my earlier videos that introduce that technology if this is new to you there's a link on screen and down below there's a fair bit to cover but please feel free to use the video chapters in the timeline or the timestamps below to jump to the section you're interested in if you don't want to watch the whole video so let's take a closer look i've reviewed a few filament or fdm printers that melt rolls of hard plastic filament and squeeze a melted plastic out of small nozzle that moves around the printer bed building up models and layers once you see a printer like this in action it's quite easy to understand what's going on resin 3d printers also build up models and layers that's where most of their similarities end and even seeing them print is not at all obvious what's going on liquid resin sits in a resin tank on top of what is essentially a smartphone screen the bottom of the tank has a thin clear plastic film made of fep or fluorinated ethylene propylene which is a non-stick material like teflon the models are printed upside down with a build plate that lowers on a single axis into the resin tank the build plate starts at the chosen layer height above the fep film uv light is shown through the lcd screen which displays each layer as a mask the resin is cured or hardened by the uv light but only in the unmasked areas the build plate then pulls its hardened layer off the non-stick fep film and then moves back down this time one layer higher building up the model in one complete layer at a time there are far more expensive sla printers that use a laser to draw the layers the mars 2 pro like most common resin printers is more accurately referred to as a dlp or digital light processing lcd resin 3d printer the main advantage of resin printers is the incredibly fine detail they produce they have much higher horizontal resolution compared to fdm printers which have to physically move a print head around the horizontal resolution is based on the resolution of the lcd panel and for the mars 2 pro is 0.05 millimeters the vertical layer height is finer too 50 microns or 0.05 millimeters the typical layer height they can go down to 0.01 millimeters even at 0.05 millimeters the
layer lines are pretty much invisible and together with a horizontal resolution parts can almost look injection molded which all makes resin printers much better suited to smaller prints or prints with lots of details another advantage of dlp resin printers is that print times are only a factor of layer height since the complete build plate size layer is processed at each layer height which is handy if you want to print multiple parts for example and can make them faster than filament based printers they're also a little more compact than ftm printers and arguably they're simpler to print with all being well you simply pour resin into the tank and print i'll come back to this in the review there are a few disadvantages though typically they have far smaller build volumes than similarly priced fdm printers and the prints do require post-processing which can be messy you generally need to wash off excess resin using ipa alcohol and then you need to fully harden them in uv light either in sunlight or ideally in a curing station the resin does have an odor so you should use a printer in a well ventilated room and you do also need to handle and dispose of uncured resin with care taking note of the warnings on the bottle if there's a chance of resin getting on your hands you should wear gloves i'll provide a link to a useful video that covers safety using resin printers in the description you also have less choice of resins to print with compared to fdm printers which can also print engineering materials like nylon and polycarbonate so for structural parts an fdn printer may still be a better choice but i will be using a supposedly stronger abs like resin from elegu in this review and also try mixing this with a tougher resin from psoriatec so we'll see what sort of results we can expect shortly in the box you get the printer itself with its external power supply and decent selection of accessories including some masks resin straining filters and side snips there's also very nicely presented user manual no assembly is required a very nice bonus compared to most fdm printers i've tested the only thing you need to do is remove all the protective wrap and install the rubber seal around the base of the lid machine is very well built not something i was expecting at this price point it weighs just over six kilogram and has a metal base with four adjustable leveling feet you can see its dimensions it doesn't take up much space the mast 2 pro has a 6.08 inch monochrome lcd screen the 1620 by 2560 2k resolution the monochrome lcd screen has a longer life than earlier printers with rgb screens and the mono lcd screen enables faster printing too with better uv light transmission the printer build volume is 129 millimeters by 80 millimeters with 160 millimeters maximum height dividing the horizontal dimensions by the resolution of the screen gives a horizontal resolution of 0.05 millimeters for example 129 millimeters divided by 2560 12 volt 4 amp power supply plugs in around the back there's also the power switch around the front there's a three and a half inch touchscreen and a usb port to use with a supplied usb thumb drive or your own to set up the printer power it on and attach the build platform tighten it to the z-axis pillar with a knob the build platform is also well constructed and the build plate has a sandblasted slightly textured finish to provide better adhesion it sits on a ball joint which you need to loosen with the supplied allen key keep hold of it just in case and make sure it can move freely ready for leveling the build plate needs to sit exactly parallel to the bottom of the resin tank it's a pretty straightforward process and doesn't need to be done every time remove the metal resin tank after loosening the two knobs and slide in a piece of paper then tap tool manual and the home icon square up the build plate to the front of the machine with slight pressure on it tighten the front ball head bolt first and then the second in that order you need to be able to remove the paper without too much resistance if there is change the z-axis movement to 0.1
millimeters and press the up arrow once tap back and then tap set z equals zero that's leveling done if your resin tank is clean you could use this to more accurately set the level since you're then using the actual fep film thickness rather than estimating the thickness with a sheet of paper but i had no trouble just using the paper and you'll usually have resin in your tank tap the 10 millimeter access movement and tap up to move the build plate out of the way slide the resin tank back in and tighten the bolts shake the resin bottle and fill the tank around a third of the way put the cover back on insert the usb drive and select the rook.ctb file and tap print the lcd screen displays a thumbnail of the print files and the screen is quite responsive it is quite dim though and you do need to look directly at it to see the icons all being well a couple of hours later you should have two rook chest test pieces printed you can't see what's going on for at least 30 minutes you should hear a slight popping sound as each layer is released from the fep film you can tap pause which will raise the bed to check progress and also allows you to top up the resin but if you follow the basic setup these pieces should print successfully before your print is ready to be used you need to first wash off the excess resin start by using the drip attachment to hang the build plate over the resin tank it's a bit of a juggling act removing the build platform screwing it onto the strip attachment and then hooking that back on the z axis without any drips of resin falling outside the tank but you get used to angling it slightly to avoid this i put the lid back on and leave it a while for as much resin to drip off as possible if i'm not in a rush i'm using the elegu mercury plus washing cure station to post-process the prints and quite honestly if you're going to get a printer like this i'd budget for one of these too you don't absolutely need one since you could wash your prints off in a tub with some ipa alcohol and a toothbrush and leave them out in the sun to fully cure or buy a cheap uv lamp if you live on dartmoor in this review i'll be using this wash and cure station fill the cleaning bucket with 99.9 ipa which you can pick up relatively cheaply on amazon or ebay i'd recommend buying at least five liters to get started which i bought for around 15 pounds fill the container to the 2.5 litre mark and make sure the curing table is removed before placing the bucket in the machine detach the build platform from the drip attachment and then move it over the wash bucket avoiding any drips slide in the metal adjustable bracket and hook this onto the upright pillar adjust the bracket so the build plate sits in the alcohol put the lid on choose a wash cycle and run it for a few minutes which spins the magnetic rotor the bottom of the bucket which agitates the alcohol the ipa gets quite cloudy after you've used it a few times but it still does the job and you can get more use out of it when it becomes less effective by letting any cured resin sink to the bottom overnight and then decanting it through one of the included filters remove the build platform and use a metal scraper to remove the print off the build plate over some paper towel the test models are very hard to remove i had to give them a short sharp stripe with a scraper to release them but most prints come off far more easily the rook model doesn't have any supports which i'll discuss shortly this is unusual for resin prints where supports are the norm if your print has supports it's probably easier to remove them now before hardening them in the cure station some will just pull off with your fingers or use a side snips for more stubborn ones remove the bucket from the machine and insert the curing turntable you can remove the brown protective film place the prints on the turntable put the lid back choose a cure setting and start off with two or three minutes the magnetic turntable rotates slowly and the vertical pillar shines uv light to quickly cure the print the manual doesn't provide much information on timings but small prints don't take long start with a couple of minutes for smaller objects if you remove them and they're still a little tacky give them a little more time too much time in the curing station can make them more brittle conveniently both the cure station and the printer use the same ac adapter if your supports leave any marks you can use some sandpaper to tide them up apart from a little damage removing them from the build plate the rook models look very impressive in the gray elegu abs like resin i'm using this resin is meant to be tougher than the standard resin and since i like to print functional parts i want this extra strength and it's about the same price too but it's still a lot more expensive than rolls of filament wait for weight is about twice the price and since you need to add lots of supports for most prints there's more wastage too not to mention failed prints which brings me nicely onto my next print our shower rail broke a while back so i designed a replacement bracket in fusion 360 which i've previously printed on an fdm printer to convert the model into something the printer understands you need to slice it just like with a filament based printer this takes a 3d model and divides it into slices or layers that the printer understands based on your chosen layer height elegu includes chittubox which is fairly easy to use although to use the latest version i also had to update the firmware on the machine i'll link to instructions on how to do this below there are plenty of tutorials online on how to use tutu box and again i'll link to a couple i recommend watching below but i'll cover some basics click on settings and add the elegu mask 2 pro for most led resins you shouldn't need to change anything but for their translucent resins you need to increase exposure times that's how long the uv light comes on for for each layer you can set that up here referring to this table you do need to get your head around how resin printers print when you're preparing your models the most important thing i found is to make sure the start of the print is anchored well to the build plate each cured layer is pulled off the fep sheet by the previous layer although it's non-stick it can still require a fair bit of force to pull this layer off especially if it has more surface area this can result in either the model being pulled off the build plate or more likely any supports that aren't beefy enough being torn apart which leaves the cured layer stuck to the fep sheet in the bottom of the resin tank which is a failed print and worse still you have to clean out the tank which is a really messy and time-consuming job this model can't be printed straight off the build plate since there's too much suction between the first few layers and the subsequent layers a large flat base like this would also tend to become slightly splayed at the bottom referred to as elephant's foot and the model will be very hard to release off the build plate it's recommended to tilt the model between 30 and 45 degrees to limit overhangs and large suction forces making sure the features that are important face away from the bed and therefore the supports supports are required to both ensure the print doesn't droop but also to avoid printing any parts of the design in mid-air how you orient and support their model will vary for each print here i'm not too worried about the bottom of the bracket which will sit against the wall after adjusting the orientation of the model with the rotate tool you then click on the supports tab in the support setting select heavy support and plus all to automatically add supports switch back to the file list tab and click slice you'll get an indication of the print time which is always at least 30 minutes quicker than the actual print time in my experience and the costs in resin if you've entered the correct price and currency and settings there's also a preview of the layers that will be sent to the lcd screen a handy little feature here is a show isolated island layers give it a minute or two and it will highlight in red any layers that will be printed in mid-air something you don't want even if this doesn't result in a failed print it will mean resin stuck to your fep sheet which means cleaning the resin tank before your next print save the dot ctb file to your thumb drive and print even if the print's successful use a plastic spatula or a gloved hand to fill the bottom of the fep sheet for any stuck bits of resin if there are you'll need to clean the tank this is my least favorite part of resin printing but i'll quickly run through it since you will have to do it at some stage you can run tools tank clean which will send by default 15 seconds of unfiltered uv light to attempt to collect any small bits of slightly cured resin floating around the bottom of the tank together with the failed layers into one thin slab of resin that you can peel off in one go theoretically you could remove this without emptying the tank but it's not easy you don't necessarily have to run the tank clean you're going to empty the resin tank and clean it out anyway you really need a funnel together with the supplied paint filters i ordered 150 filters off amazon which included this silicone funnel open your resin bottle and insert the funnel and filter carefully remove the resin tank and slowly pour the resin via the tank's corner spout back into the bottle use a plastic spatula for the last bits of resin you can push lightly up with your gloved finger to raise the edges then use ipa and some soft paper towel or microfiber cloth to completely clean the tank i like to have some degreaser wipes to hand to keep my nitrile glove clean and i found scott's workshop towels to be very absorbent and soft enough not to scratch the fep sheet microfiber cloths would be better but i saved them when i've got rid of all the resin i used a microfiber cloth on the underside of the fep sheet too you can also use the wash station to clean the tank using the cleaning basket when it's completely clean i gently also clean the lcd screen with a microfiber cloth and place the tank back in the printer a little camera air blower is handy for making sure no drive particles remain on the fep sheet coming back to this model even with heavy supports your two boxes default support settings are too conservative for a model like this there's too much suction for the fep sheet for these layers just above the anchoring supports which results in the sports getting pulled apart and the print failing the most obvious solution is to add more supports but i also have prints stuck to the fetch sheet with other models so i attempted to improve the release of the fep sheet by rubbing in some ptfe lubricant with a dry soft paper towel a tip i saw in another youtube video from bluebrain i still had issues with prints sticking a little too well to the feb sheet so i tried replacing the feb sheet and they could provide a couple of spares and a step-by-step tutorial on how to do this ultimately a combination of the ptfe tip and over supporting models especially more functional heavyweight models did the trick i've had no failures more recently i did note in prusa's instructions for their sl1 and sl1s resin printers that they recommend not using ipa to clean the theft sheet possibly since it does too good a job we still need the feb sheet to release the print they interestingly recommend cleaning the tank after every print and using only warm water and washing up liquid i would like to try some of epax's non-fep sheets when i get a chance which are meant to do a better job of releasing prints this model you can either add manual supports or up the 50 density to at least 75 for the auto support i still always go back and at least over support the initial anchoring layers of the print this model ended up printing quite nicely and i installed it in the bathroom unfortunately it didn't last very long it snapped off a day later it's not a very scientific test but even fcm prints from pla plus lasted way longer so i still need to find something stronger a functional print i'll come back to a possible solution shortly i stuck with a default layer height of 0.05 millimeters and tried a few more prints first off a couple of test sprints this mirror labs calibration print shows off the level of detail resin prints can produce this is a little larger than my thumbnail i also experimented with exposure times with the free resin exposure finder on github you run a piece of g-code on the printer which prints a chart with exposure times from 0.5 seconds up to 5 seconds and then
slice a small calibration square at the exposures you want to test i found i could go a little lower than the default 2.5 seconds two seconds gave slightly better results and interestingly lychee slicer uses 2 seconds for this printer lychee slicer is an alternative to tutubox and can still export ctb files that can be printed off the mars2 pro i found it easier to use compared to tutubox and has more features in its free version although there is a 20 second ad on the free version when you export a file i printed my final calibration print with auto supports in lightroom slicer the 3d benchy is a popular filament printer test here i halved its size but it still came out very good with an amazing amount of detail you can even read the tiny text on the back of the boat i hollowed out this model and added a couple of drainage holes at the bottom so no resin gets stuck in the side many models don't need to be printed solid and resin slicers have the ability to hollow out your model but like cheese slices implementation was the most intuitive next i tried a miniature off the usb stick there's a few on there but i chose the barbarian miniatures are a hugely popular use for resin printers i could definitely do a better job taking extra time with support it came out pretty well and this is before any cleanup my garmin 1000 cycling computer's power button had worn out so i printed out a replacement button off thingiverse this worked perfectly and although i printed this on my prusa printer before it came out much better with the mask 2 pro this lego minifigure came out nicely but i was a little heavy on support as you can see around the back but again you could sand some of those marks away i printed a belt buckle to see how much flex the elegu abs like has it came out quite nicely and there's plenty of flex but it's still brittle the edge of the buckle broke after a few insertions most of these prints took between one and a half and three hours but i thought i'd try a larger print i used prusa slicer this time to slice this model of a bernie sanders meme from chaos core tech which i also hollowed out although i forgot to add drainage holes it's a faff using prusa slicer but i'm quite familiar with the program and i found its auto support is quite good you have to hollow out the model in lightview slicer or tutubox then add supports improves the slicer then export an stl with supports and import back into tutubox or lychee to export to a ctb file so it came out looking very good considering i spent less than five minutes adding supports and the supports came off easily but i did pull off one arm of the glasses a little carelessly since i still like to use this printer mostly for functional prints i started experimenting with tougher resins there's far less information about this online but i tried mixing the elegu abs light resin with psoriatec's tenacious resin which is tough and slightly flexible but also very expensive i tried a three to one ratio of elegu to sorayatek which brings a cost down and should make for tougher prints with better impact resistance i printed the exposure test again to confirm i didn't need to adjust the exposure times and went about printing two parts for the bumper of my son's rc car which had broken off you can see how it's easy to quickly start exceeding the size of this small build plate with some careful orientation i did manage to fit both parts on i realized halfway through this print i hadn't added enough resin but one part of the bumper is still completed it's a shame the printer has no sensor to alert you of the resin being low like some more expensive printers have i haven't done enough testing yet and we'll need to experiment further with ratios but parts do seem a little less bristle i could probably use 100 tenacious for the rc car bumper with its good impact resistance but it'll be harder to print and expensive sorry tech also have their blue tough resin which i may try at some point but it's also pricey and needs to be warmed up before printing and requires additional post processing which all sounds like a little too much faff and all these resins don't have very good temperature resistance there are resins available like frozen's tr 300 that can resist temperatures up to 220 degrees centigrade which i haven't tried yet finally i use my phone's front truedepth camera to make a 3d scan of my head any iphone with face id will work scaled down to 25 and hollowed out this came out pretty well and i now have a slightly eerie memento this review the printer is fairly quiet in operation there is a fan running and the sound of the build plate moving up and down but it's probably the popping sound of the print lifting off the fep sheet that you hear the most i can still work with it printing less than a meter away without too much trouble and although the resin does smell the printer has an active carbon filter built in which together with a lid means it's not really noticeable most of the time worryingly this karma filter doesn't appear to be user replaceable though a slightly more substantial and tighter fitting rubber seal on the lid might improve things further i'd also really like the lid to be hinged so you don't have to find somewhere to put it i could probably install a handle on the top to at least make it removable one-handed ideally the wash and cure station would also have a hinge lid there are quite a few consumables you need for this printer or any resin printer as well as the resin itself the fet sheet will need replacing if it gets scratched or becomes cloudy you definitely don't want it tearing since that can be very messy as i mentioned the printer comes with two spare sheets and you can get a replacement set of five around twenty pounds or twenty dollars another option is some spares and tanks which already have the pep sheet installed and come with lids so handy if you want to print in different resins without having to empty and clean the tank the lcd screen is also considered a consumable but should last a fair bit longer although i couldn't find out any details on how long it should last for this printer proofs are quote two thousand hours for their mono lcd screens these aren't too expensive they're currently listed at just over 30 pounds or 30 on amazon you also need ipa gloves and filters and silicon slat mats are pretty handy too they're cheaper if you buy them as pet food mats like these ones from amazon basics so overall resin printers are more expensive to run than fdm printers even though the upfront cost might be a little cheaper it's difficult to find many faults with the mars 2 pro from elegu nearly everything about it is well built from the base to the resin tank to the build platform this is especially impressive considering its price though i really would budget in the mercury plus cleaning and curing station or something similar to try and minimize contact with the resin and speed up post processing you do need to be very careful with the resin and follow all the safety precautions but i wouldn't let this put you off trying resin printing and that's mostly because it's hard not to be impressed at the quality of prints it can produce the only real issues i had more related to the rather steep learning curve even with plenty of experience of 3d printing with filament-based printers it did take quite a few failures to understand how to get successful prints you do need to spend a bit of time understanding the slicing software and most importantly supports the printer itself is quite easy to use and hopefully this video will help you get started if you're going to go with auto supports i've tried lychee slicer i've got much better results than from tutu box at least for the larger more functional models i like to print but i'd recommend choosing the medium support setting and sliding the support density to high at least to start off with also run the islands detector and let it add supports to all islands it's much better to have successful prints even if there's a little more print tidying up to do than to have to repeatedly clean the resin tank i would like to see a slightly higher quality step sheet that didn't require manually coating with ptfe if at all possible which i'll come back to in a minute i don't like the active charcoal filter not being user replaceable ideally it'd be far more convenient if the covers for both the master ii pro and the mercury plus were hinged in some way finding somewhere to put them is not always easy and a resin level sensor would be a nice addition too depending on what you want to print you might find the small build volume plenty but i found it a little restrictive compared to what i'm used to with ftm printers i'd be interested to try resin prints with a bigger build plate at some point in my initial testing with more functional prints i found resins a little more brittle compared to materials i can print with on ftm printers even with so-called abs like resins and mixing inexpensive specialist resins i look forward to experimenting with this further testing a few more engineering grade resins even if it's messy it can be fun playing the chemist combining resins to achieve the exact mechanical properties you need for a project resin printing does seem to be a few years behind fdm printing in some ways especially for these more structural parts rather than miniatures and props which it excels at i think this will change rapidly as printers and resin technology advances and prices come down if you want to ditch your toes in resin printing though i think this printer is an excellent option there is also the mars 3 that elego has just released it has a higher 4k resolution and a slightly larger build volume and it has an upgraded fip 2.0 sheet that i'd like to try on the master ii pro as i alluded to earlier but it's a non-pro version and doesn't have the built-in carbon filter and it's more expensive but i'd love to know what you think are you tempted to try resin printing and if you own this printer what do you think of it please let me know down below and as always if you have any questions please ask i read every comment and we'll do my best to respond i do hope you found this video useful please like the video if you did i'm releasing videos every week on the latest technology and how to get the most out of it so please make sure you subscribe it helps more than you think and don't forget to tap the bell icon if you want to get notified as soon as a new video gets uploaded thanks for watching you
2021-11-29